Yes, you can build your own beehive. Make a great environment to harvest honey by starting beekeeping. All you need to do is purchase all the equipment you need for the project. However, you might need more hands to build your beehive. Building your beehive will save you money and give you a close-up look at the inner workings of the beehive. You are at liberty to choose materials that match your budget.
How much does it cost to build a beehive?
A single new hive may cost about $150. For a successful project, you need to invest in supplies such as a hive, proper protective clothing, a smoker, and a hive tool. Clothing and gear may cost about $160.
Consider variables that affect your total cost to start beekeeping. Account for the beekeepers involved and the kind of hive configuration you plan to use, the colonies you are starting with, the type of bee package you want, and where to place your hives.
These calculations help estimate your cost to start beekeeping. The cost also depends on the choices you make. As much as your actual costs vary, you will have an estimate for shopping.
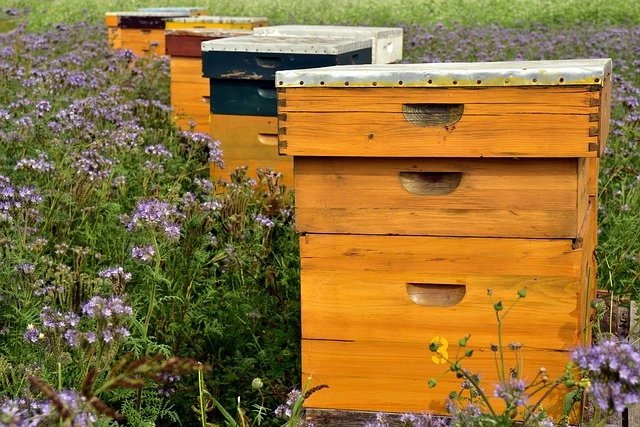
Types of beehives
- Langstroth Hive: This is the most commonly used beehive in the world. It consists of stacked boxes with frames that hold the honeycomb. The frames can be easily removed for inspection and honey harvesting.
- Top Bar Hive: This type of beehive does not use frames but instead uses bars that run horizontally across the top of the hive. The bees build their comb from these bars. It is a more natural approach to beekeeping and requires less equipment.
- Warré Hive: This is a vertical top bar hive designed to mimic bees’ natural habitat. It consists of boxes stacked on each other, each slightly smaller than the one below. The bees build their comb from top bars, and the hive is meant to be left alone as much as possible to allow the bees to manage their colony.
How to make a simple beehive
- Build the bottom part of the beehive by gluing and screwing the floorboards in place, filling the screw holes with wood filler, and sanding to 100-grit.
- Make an entrance reducer.
- Use foil tape to cover the rabbets in the hive body ends.
- Fasten handles onto each face of the hive body using glue, then fill the screw holes with wood filler and sand to 100-grit.
- Build honey supers.
- Make frames.
- Assemble the inner cover.
- Install the roof.
How to build Langstroth Beehive
Building a Langstroth hive is a worthwhile project that can provide a safe and comfortable home for your bees. Here are the basic steps:
Gather your tools and materials: you’ll need a saw, drill, hammer, tape measure, and other basic tools, as well as the materials listed in the previous answer.
Cut and build the tops: The tops are the boxes that hold the honeycomb frames. Cut the boards to the appropriate size and assemble them with the trim head screws. Leave a small gap between each box so the bees can move freely between them.
Cut a notch at the top of each box, giving you room for the inner and outer covers.
Make the base: The bottom is the underside of the hive and should be constructed to provide good ventilation and drainage. Cut the boards to the correct size and assemble them with the decorative head screws.
Fabricate frames for each box: The frames contain the combs and should be the appropriate size and shape for your hive. Use the 1×2 and 1×3 boards to construct the frames and attach them with the decorative head screws.
Fabricate the inner and outer covers: The inner cover sits on top of the upper box and provides ventilation, while the outer cover protects the hive from the elements. Cut the boards to size and assemble them with the decorative screws.
Apply a coat of primer: This will protect the wood and provide a good surface for the paint to adhere to.
Finally, paint with a top coat: choose a high-quality, weather-resistant paint that will protect the hive and look good for years.
Can you start a beehive without a queen?
No, it is not possible to start a hive without a queen. The queen bee is the most important in the hive. She lays the eggs from which the next generation of bees will emerge. Without a queen, the hive will not grow or survive. The worker bees will eventually die off, and the hive will collapse.
When you start a new hive, you need a queen bee. There are several ways to get a queen, such as buying a queen from a beekeeper or “splitting the hive”,” where you take part of an existing hive and put in a new queen.
It is important to note that not every queen is suitable. A healthy, mated queen with good genetics is critical to the hive’s success. When inserting a new queen, it is essential to take proper precautions to ensure that the bees accept her and that she begins laying eggs as soon as possible.
Will bees move into an empty hive?
Bees are known to move into empty hives, but it’s important to note that luring bees to a new hive can take time and effort. One way to encourage bees to move in is by adding frames with beeswax, which can act as bait and make the hive more appealing to a swarm.
Another factor to consider is the size of the hive opening. A smaller opening can make it easier for new bees to defend the hive and make it a more attractive option. It’s also essential to ensure the hive is clean and free of any debris or remnants from previous hives, as this can deter bees from moving in.
If you’re trying to attract bees to an empty hive, it’s important to be patient and persistent. It can take several weeks or even months for bees to discover and move into a new hive. Some beekeepers use attractants like lemongrass oil or pheromones to encourage bees to investigate the hive.
What wood is best for beehives?
Pine is a popular and affordable choice for hives. There are several varieties of pine, and not all are suitable for hives. The best pine for hives is kiln-dried, untreated pine. This type of wood is free of harmful chemicals and excess moisture. Cedar and cypress are other options for beehives. Cedar is durable and naturally resistant to insects and rot. Cypress is also resistant to rot and repels insects but can be more expensive and harder to find.
How long will a beehive last?
The lifespan of a hive depends on several factors, including the quality of the materials used in its construction, the climate and weather conditions in the area, and the degree of maintenance and care provided by the beekeeper. In general, the structure of a hive can last several years if it is well-built and properly maintained.
However, the life span of a bee colony is much shorter. The lifespan of individual bees depends on their role in the hive, with worker bees typically living a few weeks to a few months and the queen bee possibly living several years. Over time, the bee population in the hive naturally declines, and the colony will eventually die out.
To keep a bee colony healthy and productive, it is important to maintain it regularly, such as removing old combs and debris, inspecting it for pests and diseases, and providing adequate food and water. Regular inspections and interventions can help extend the life of a colony and prevent premature hive death.
Parts of the Beehive
Bottom Board/Floor
Bottom Board is the base of the beehive. When building up, you will realize that you do not want the bees to get out of the top of the hive. The base is their only exit.
Entrance Reducer
An entrance reducer is a cleat used to adjust the size of the hive’s entrance. It also controls ventilation and temperature during the season. There is no need to fasten it to the rest of the assembly, but you can use it as an optional accessory.
It is used frequently during winter, for other animals, such as mice, will try to enter the hive for warmth. That is why during summer, especially at the height of nectar flow, you can remove it to maximize honey production.
Hive Bodies/Deep Super
Hive Bodies are the boxes where the bees live. They contain comb frames at the height of 9-1/4 inches. That makes dimensional lumber very easy. You can have two deep hive bodies. That is one for the brood or family and one for the food. In cold weather locations, a bee colony survives with one deep hive body.
Adding foil tape to the rabbets on the boxes makes it easier to scrape the wax and propolis from the rabbet when the frames are out. The metal protects the wood from getting scraped away.
Queen Excluder
The queen excluder works during the honey season. It is not involved with the actual production of honey. Place the queen excluder between the brood and honey production. There are slits to let colony bees through but not the queen. Excluders are in plastic or metal.
Honey Super
That is where the surplus honey is collected from the bees. You do not take all the honey from the hive. Leave it in the deep hive bodies for the bees to survive. You only need one honey super during your first season, but you can add two or three for the later seasons.
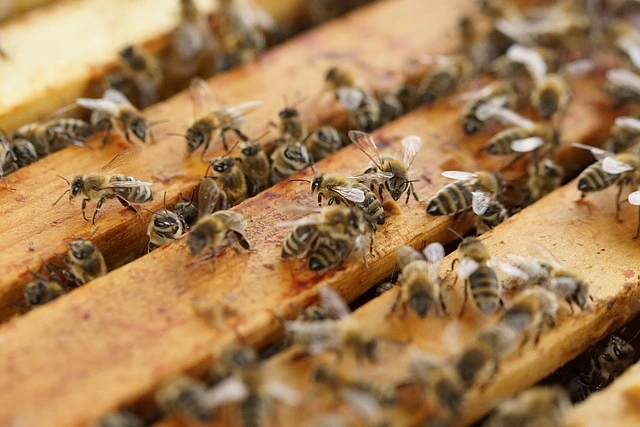
Frames
Bees build their honeycomb into the frames. Inspecting frames is easier because they are removable. You can use the wider part at the top to make space for bees. Push them together. Each frame needs a single sheet of beeswax foundation.
Foundations come in three sizes, matching different hive bodies and supers depths. Be patient since beeswax foundations are difficult to work with at first.
Inner Cover
The inner cover is a tray with a hole and a small notch for ventilation. Screened inner covers are popular due to efficient ventilation with no fuss.
Outer Cover/Roof
The outer cover is like the roof of your house. It protects the bees from the elements. You can extend the life of your hive by attaching weatherproof material like aluminum flashing to the top of the roof.
Material for building a Beehive
If you’re planning to build a beehive, you’ll need a few key materials to get started. Here are some of the most important ones:
- 1/4″ plywood: This thin, lightweight material is often used for the sides and bottom of beehive boxes. Make sure to choose high-quality, moisture-resistant plywood to ensure that your hive will last.
- 1×10 board: This is a thicker, more substantial board often used for the main body of the beehive boxes. It’s important to choose a board free of knots and other defects, as these can weaken the hive’s structure.
- 1×2 and 1×3 boards: These narrower boards are typically used for building the frames that hold the honeycomb. Make sure to choose boards that are straight and free of defects.
- 1-1/2″ and 1-1/4″ trim-head screws: These screws hold the hive together and attach the various components. Trim-head screws are preferred because they are less likely to split the wood.
- 2″ trim-head screws: These longer screws are used for attaching the hive stand to the bottom of the hive.
In addition to these materials, you’ll also need some basic tools such as a saw, drill, and measuring tape. Having some wood glue on hand is also a good idea to reinforce the joints.
When building your beehive, following a proven design and construction plan is important to ensure that your hive is safe, stable, and functional. Many resources available online and in print can guide you through the process, including plans for different hive styles and sizes.
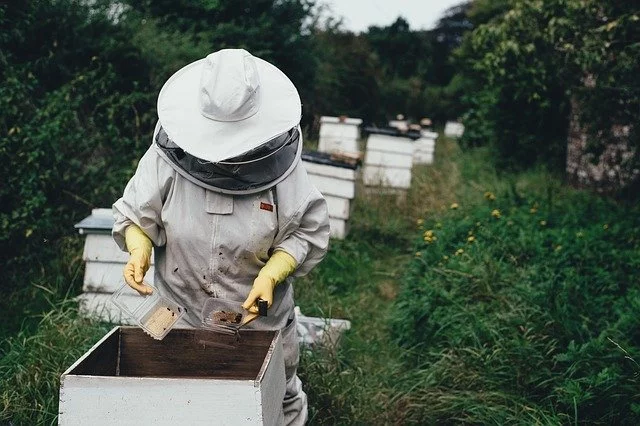
Taking Care of Your Beehive
Taking care of a beehive requires consistent attention and maintenance. Here are some key tasks to keep in mind:
- Repair or replace damaged parts: Regularly inspect your beehive for any signs of damage or wear and tear. If you notice anything that needs repair or replacement, such as a cracked or warped frame, take care of it immediately to prevent further damage.
- Install entrance blocks: An entrance block can help regulate the airflow in your hive and prevent pests from entering. Make sure to install one that is the right size for your hive.
- Install excluders and supers: A queen excluder can help keep the queen bee from laying eggs in certain hive parts, while supers provide extra space for honey storage. Both can be useful tools for managing your hive’s growth and productivity.
- Replace any lost beeswax: Beeswax is an essential component of the hive structure, so replacing any lost or damaged wax as needed is important. You can do this by melting down existing wax and molding it into new frames or foundation.
- Install a rain cover and shade structure: Protect your hive from the elements by installing a rain cover and providing shade. This can help prevent moisture buildup and keep your bees cool during hot weather.
- Provide enough ventilation: Good ventilation is important for maintaining healthy bees and preventing disease. Ensure your hive has enough ventilation but not so much that it gets too cold or drafty.
- Add a windbreak: A windbreak can help protect your hive from strong winds and maintain a stable temperature. You can use hay bales or wooden boards to create a barrier around the hive.
- Control woodlice and termites: These pests can cause damage to your hive and harm your bees. Keep an eye out for any signs of infestation and take steps to control them as needed, such as using insecticides or removing infested wood.
By following these tips and staying vigilant about the health and wellbeing of your bees, you can help ensure a thriving hive and a bountiful honey harvest.

- Grain and Sheen: Teak Oil versus Danish Oil Uncovered - January 10, 2024
- The Cherry on Top: Crafting the Perfect Cutting Board - January 9, 2024
- Polyurethane Water-Based vs Oil-Based: Choosing the Right Finish - January 8, 2024