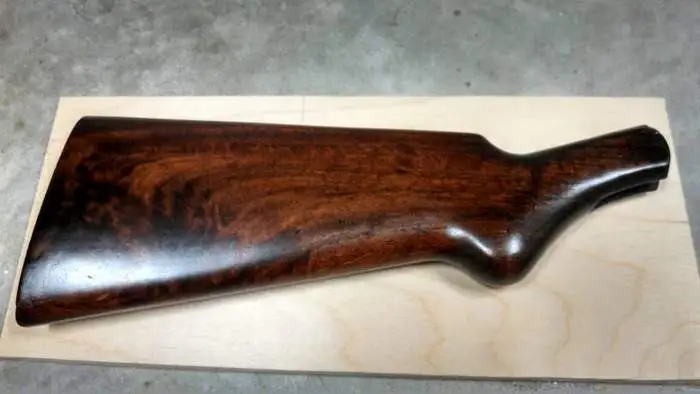
Dyeing your gunstock is easy to do, and there are many colors to choose from. It can transform the appearance of a gun, giving it a unique look that can match any outfit or occasion. Do you want to change the entire look of your gun or add a few little touches? You can dye your gunstock on your own with a few simple tools, including a dye kit.
Can you dye wood with RIT?
Using RIT as a tool for dyeing your unfinished wood will create a beautiful finish. Many consumers prefer his option because the product lasts long. You can expect this finish to survive for at least two years. It can sink deep into the wood, meaning it won’t begin to peel in the same manner as the paint will. The option is natural and water-based dye; therefore, it is best to preserve the wood’s natural grain. This feature adds depth and texture.
It is important to note that different woods require specific finishes. An example of this is Pine and Wicker, which are more absorbent and often only need a single coat. When dealing with softer woods, you will always likely require fewer coats of dye. When dealing with Hardwoods, they are less likely to absorb the stain and need several coats to complete. The immersion method is best for dyeing small items. The brush method is best if you are dyeing large pieces of wood or wicker.
Can you paint a wood gun stock?
- You will require sandpaper in varying grains from coarse to fine grit. It will be a crucial tool in preparing the rifle’s stock. The sandpaper will smooth out any rough spots or cracks in the wood. If there are any dents in the wood, the sandpaper will expose them so they can be filled in with filler.
- When you feel the surface is smooth and well sanded, you will need to wash the stock. Washing the store will help to remove the dust. Use hot water for this purpose. Avoid drowning the metal part of the gun in the water. A few splashes are acceptable because the metal is often sealed against moisture damage.
- Make sure the wood has been degreased. A thin degreasing liquid should help prevent the paint from failing to stick. Even while working on the wooden stock, it is essential to wear gloves. These instruments should protect your gunstock against the natural oils on your skin.
- When painting the stock, make sure that you wait 24 hours before applying a new one. This period should allow the paint to dry.
- It is advisable to add a protective varnish to the wood after being painted. This process should help to prevent peels and cracks.
Can you paint a gunstock?
It is possible to customize your rifle stock by painting it easily. It is advisable to use epoxy-based primers and paints when sprucing up the look of your gunstock. Many consumers choose to go this route when they can’t buy a wooden gunstock as it is often more attractive naturally.
- You will want to start by detaching the synthetic stock from the rifle.
- You will need to sand down the gun stock carefully to ensure that you remove the parting lines. A 180-grit sandpaper should be sufficient for this task. It can be done by hand until you feel the surface is smooth enough to paint over. Avoid mechanical sanders as these can cause unnecessary damage to your stock.
- To mark the boundaries for the paint, you will need to tape the interior bedding. Try to contour this tape with the painting design you have in mind. Ensure it flows well with the exposed surface of the stock.
- Add three coats of paint over 72 hours to be safe. It is best to start with a thin coat of epoxy-based primer and repeat it once a day for three days.
- Once the three days have been completed, you can remove and replace the masking tape.
- You can spray on a light coat of varnish or lacquer for this stage.
- After 24 hours, the lacquer should have dried, and you can now remove the masking tape.
How to dye gunstock step by step
- Start by protecting the workspace by covering the area with a plastic table cover. Many woodworkers have a reusable option, but those without can use newspaper.
- It is a good idea to start with sanding the wood. Sandpaper can handle the previous layer of strip paint, varnish, or wax. Wipe clean with a tack cloth when complete.
- Make sure to use gloves.
- You will need approximately 120 mL of liquid dye and 470 mL of boiling water.
- Once the formula is mixed, you need to test it on scrap paper. This task will help determine the color you will get on the wood. A color that is too light will require you to increase the dye ratio. A color that is too dark will need to be diluted by adding more water to the mix. As the dye begins to dry, it will get lighter.
- You can achieve a soft sheen look by wetting the wood and adding the dye after 15 minutes.
- Spread the dye mix using a foam bristle brush. An old cloth can also spread the dye over the surface evenly. It can also be possible to use a combination of the three. This tool is the premium choice.
- Make sure to let the dye dry completely before adding additional coats.
Checkering a gunstock step by step
- You need to start with a flexible rule and wrap it around a curved surface at a 20° angle.
- It will appear like the rule curves around the curved wood. Keep in mind that the rule edge is straight, and as a result, the line is straight.
- You want to sketch the pattern lines along the rule edge using a pencil.
- This will need to be scribed in to help guide you on the pattern.
- A single line tool will help you to cut a master line.
- A good pattern, to begin with, involves cutting an intersecting line at approximately 40°.
- A two edge tool will help ensure the parallel grooves are well defined.
- Ensure that the stock is secure. A bench clamp should work fine.
- 6 Tips To Craft The Perfect DIY Woodworking Project - August 1, 2022
- Six Reasons You Need an Air Filter In Your Wood Workshop - August 1, 2022
- American made wood lathes - May 26, 2022