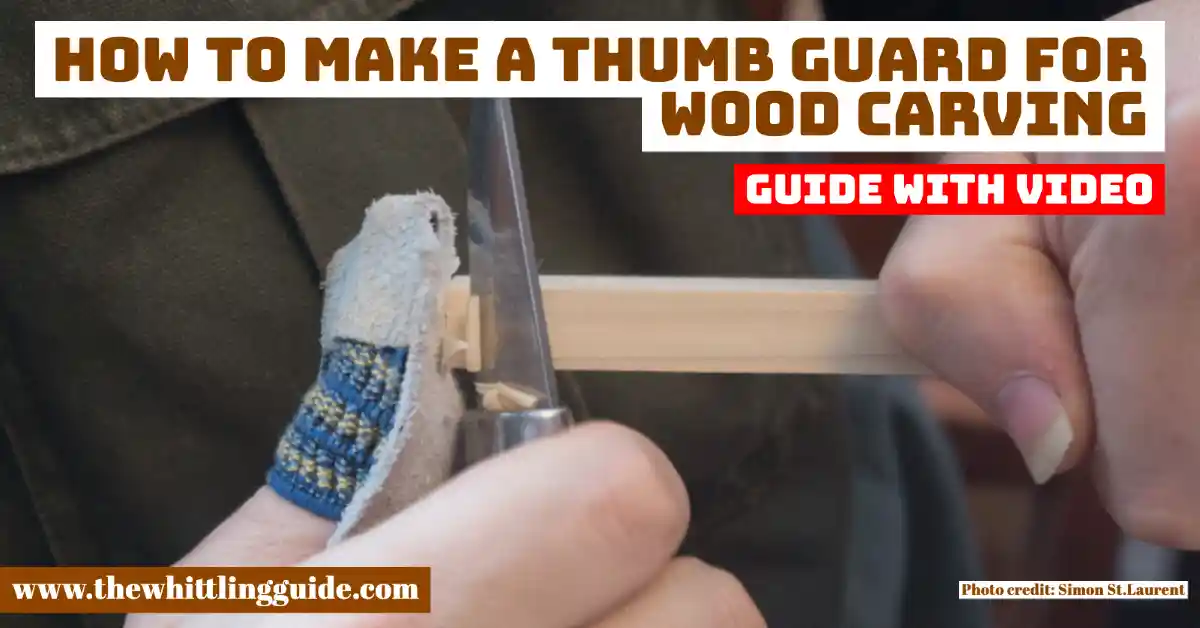
Need a homemade thumb guard?
We have all seen the horrible injuries that woodcarvers sustain, and it’s heartbreaking. The thumb is your most essential limb when carving, and you do not want to ruin it by clamping your hand in a vise or wedging it between a piece of wood. You can prevent those injuries with simple wood carving finger protection! We will show you how to make a thumb guard for wood carving with simple tools.
Materials Needed
Recycled leather
Fancy a leather thumb guard? Using leather to make the thumb guard is affordable because it does not mean buying the material from the shop. You can use recycled leather, which works for both budget and non-budget users.
The material should be hard enough to prevent the knife from penetrating the skin. However, if your material is not that tough, I urge you to wear safety gloves to avoid injuries. The knife is sharp, and any mistake gets you cut. I recommend genuine leather so that you have a thumb guard that lasts.
Safety tape
The plasticized tape has put the thumb making a custom guard. It is a self-adhesive tape used by veterinarians. Use duct tape to reinforce rubber thumb protectors. Apply multiple layers of safety tape around the finger to stay safe. For extra safety, put a pad underneath the plasticized tape, which is ideal for rougher pieces.
Dust mask
Chainsaw carvings produce dust, and it is a must to put on a mask. I urge you to wear a safety mask whether you are a professional or a beginner in the wood carving industry. However, it depends on the wood you are carving and your method.
Whittling does not expose you to dust, and you can operate the thumb guard without a safety mask. The dust particles produced should not be underestimated, putting your health at risk. Disposable masks are convenient, but reusable safety masks are economical. Safety masks with a single trap are ineffective as they come with a single layer of material.
Tools
Knife
Use a well-sharpened knife when using a thumb guard for wood carving. Having a knife is not enough. Know how to use the knife correctly. Proper handling of the carving knife is required. There is a proper and improper way of holding the knife.
Master a safe way of sharpening your wood carving knife. Make sure that it is the correct tool before you think of working on your material. The carving knife should be comfortable to work with so that it will not strain your hand. Sharpening your carving knife is dangerous, and you need caution.
Flat stone
A flat stone is for sharpening your carving knife. It is safe since it does not slip away from your hand. If it slips off your hands, it does not cut your fingers. Keep the blade flat against the sharpening stone like you. The knife does not have to stay dull, requiring more pressure when cutting.
Chisel
Chisels come in different shapes and sizes, with a sharp cutting edge and a wooden handle. The chisel is used by striking it with a carving mallet or pushing it, which is why it is comfortable to use.
Gouge
The gouge looks similar to a chisel. The difference lies in the curved cutting edge that comes with a gouge. That makes the scoop at the end of the blade. Gouges are for making deep holes inside the wood.
Mallets
Mallets work with either gouges or chisels, and it strikes the wooden edge of the tool to push it deep into the wood.
Choosing the Right Material for your whittling thumb guard
You cannot work with a thumb guard when you do not know the material. That exposes you to poor-quality material and misuse of the tool, slowing down the process. Know what the project you are running requires, then you choose the appropriate material.
Choosing the Right Dimensions
Choosing dimensions ensures accuracy in wood carving. How do you work on wood when you do not have the details of the appropriate dimensions?
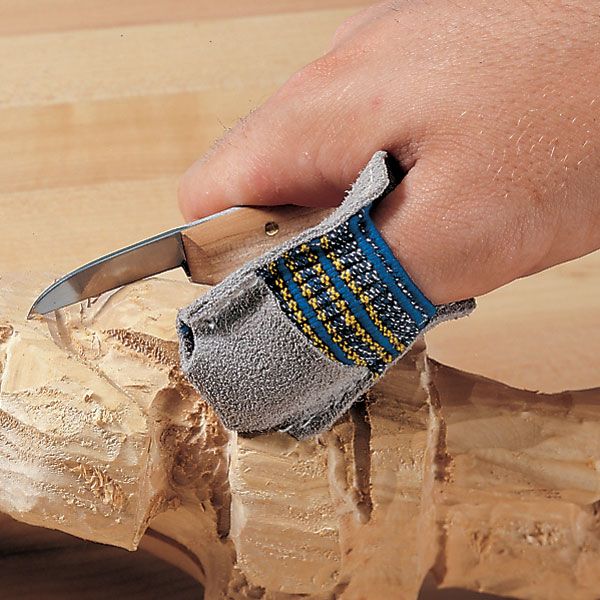
How to make a leather thumb guard
Cut your leather for your thumb and make a hole for the thumb. Your thumb has to go through the bottom into the guard, and that prevents the thumb from slipping off. Make holes on the four corners that are 1/4inch apart from each other. Make use of the drill. Trim the leather off to reduce the thumb. Keep both hands on the tool, so you do not lose control of the thumb guard. Proper hand positioning keeps you holding the thumb guard, keeping your hands safe. The reason why the thumb guard is leather is that it protects your fingers from cuts. When using the knife for wood carving, your hand is exposed to the carving knife.
Cutting the Strips
You make a bed for your finger to rest on. Measure the length of your thumb to make sizes for the strips. What follows are the strips that make the thumb guard right round. The strips should be long enough to be under the knuckle. Apply tension to the tape and wrap it around your thumb. Keep wrapping up till you get the grip you want.
Making the Triangle
The triangle rests on the collar, and it comes from any position. The triangle is an overhand grip made with the thumb facing your body.
Safety
The first step to ensure your safety is to hold the device and keep both hands on your tool. A wood carving thumb guard does not facilitate recklessness, and you must still exercise caution. Carving knives are harmful to the user. They are still sharp, and they easily cut any time that comes their way. That is why you need carving gloves. They are cut-resistant, and you will not have your thumb cut.
When drawing the knife blade across the surface, it does not cut through, and jabbing the tip of the knife damages the knife. The thumb and finger guards protect your fingers from being cut, and they come with an elasticized insert to stay in position. However, they are not puncture-resistant.
The wrap-around design that comes on both ends gives you extra protection. The thumb guard works with a pulling knife that faces towards the thumb. Do not carve without the finger or a thumb guard, preventing you from adding color to your work.
The finger wrap allows you to add self-adhesive tape that does not require pins or clips. They are not restrictive and flexible, they are breathable and do not leave a residue, and they have a rubbery texture that clings when wrapped over themselves. The apron is heavy-duty material with an adjustable neck strap, and it is one-size-fits-all.
You are allowed to use it at full length. If you need a pocket, you fold it up to make a pocket. The pocket keeps your chips and carving tools. Use hook and loop fasteners to secure the pocket.
The sewn pocket holds your pencils, preventing you from bumping into tools and misplacing your tools.
Keep the absorbent gauze pads and bandages if you do not have a glove to protect your fingers or hand. If you cut your hand, I urge you to use a sterile absorbent gauze pad to apply pressure to the cut. Repeat the process till you stop bleeding. After cleaning the wound with water, use an antibiotic cream over the cut and apply a bandage. If you cannot treat the injury, visit a doctor. See our Ultimate Wood Carving Guide. Keen DIYers may also be interested in How to make a Wood Carving Bench + A Recommended Easy To Follow Plan.

- Grain and Sheen: Teak Oil versus Danish Oil Uncovered - January 10, 2024
- The Cherry on Top: Crafting the Perfect Cutting Board - January 9, 2024
- Polyurethane Water-Based vs Oil-Based: Choosing the Right Finish - January 8, 2024