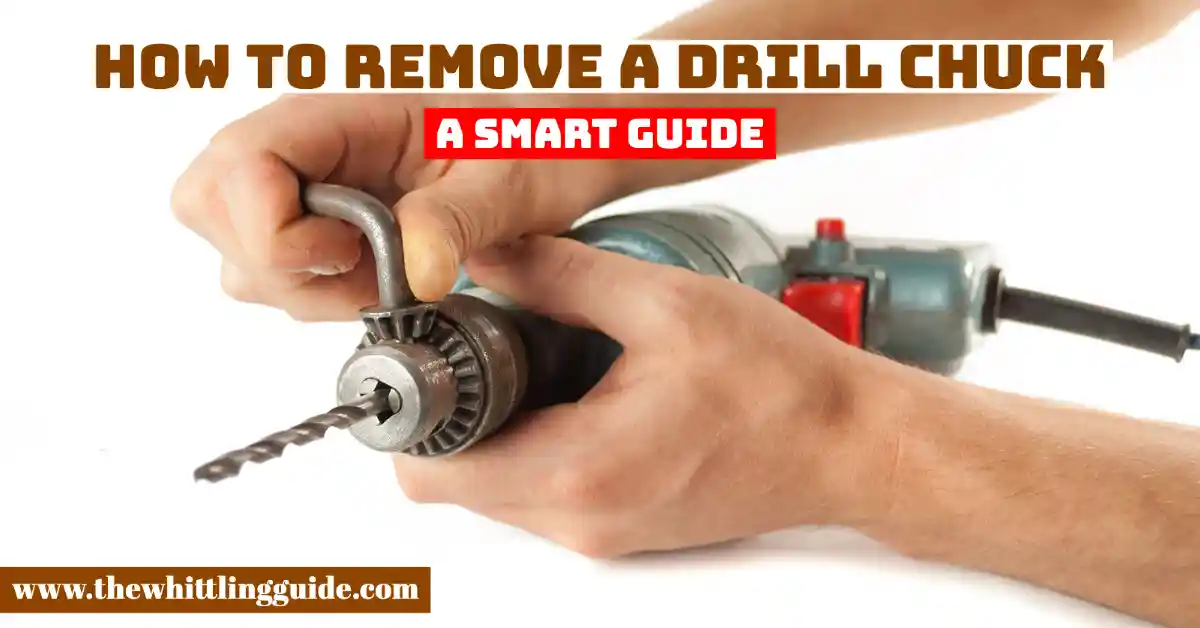
Removing chuck from drill
Your drill chuck comes in different shapes and sizes, but most have a hole in the center that is used to hold the drill bit. A drill chuck is a small metal shaft that fits into the center of the drill bit. The drill chuck comes in many sizes to match the available drill bits. You can use a drill chuck wrench to align your drill bit properly. If you need to remove the drill chuck, the wrench will follow the shank to push the drill chuck out of the drill bit. You can use the wrench to remove the drill chuck in two ways. The first way is to use the wrench to push the drill chuck out of the shaft by hand. Let us go into more detail.
Remove drill chuck
A drill chuck wears down with time and gets rusty and dusty. That results in defaults and poor performance. It is now up to you to clean it or replace it. The first step is removing it from the drill. Below are instructions to follow when removing the drill chuck. For keyless chuck instructions, adjust your chuck by hand and for tapered chuck instructions, use a key or a drill press chuck removal tool.
Drill chuck removal steps
- Get a large Allen wrench and tighten it up in the chunk. For a cordless drill, put it in low gear and the drill position.
- Take a hammer and strike it to loosen the chuck off the spindle.
- Wind the chuck off.
- Take a new chuck and spin it hack.
- Tighten it up using your hands and, finally, with a screwdriver.
- Run the drill for testing.
How to replace a chuck on the drill
Steps
- Unscrew the screw at the center of the chuck if there is one. If it does not, go straight with your Allen key. Insert it the same way you insert a drill bit and clamp it in place
- Undo the chuck with a spanner using a vice or hand.
- Spin the chuck using the Allen key and remove the chuck from the shift
- When you want to replace it, screw the chuck on the shift.
- Tighten the back of the chuck using the scanner.
- Screw back the screws into the chuck.
How to change drill chuck
Changing a Keyless drill
- Remove the screw in the center of the chuck and loosen the jaws of the chuck. There is a screw at the base that you must fasten to the drill case. The screw has thread-locking fluid that requires more energy. Use a proper screwdriver to remove the reverse-threaded screw.
- Some models do not have screws and in that case, skip this step. If the screw is stuck, knock the screw loose and remove it.
- The process involves inserting an Allen wrench into the chuck and turning the Allen wrench as you tighten the chuck. It has to be in place.
- Set the gearbox to the lowest setting so the gears have less resistance.
- Use a mallet to tap the Allen wrench; it has to lie as you position the drill. The Allen wrench has to overhang the workbench. Make a downward strike on the end of the Allen wrench using a wooden or rubber mallet. Striking it in a counterclockwise direction loosens the chuck from the drill. If you are not sure, seek guidance from the manufacturer. You must be sure if your model is standard or reverse threaded onto the drill spindle. If the strike is forceful, you will crack the drill casing. Use light force and, when necessary, increase.
- Remove the chuck using your hand by unscrewing it.
- Replace the fluid on the screw and apply a bit of the fluid onto the end of the screw. Spread it evenly as you roll it on your finger. If the keyless chuck does not have a screw, use thread-locking fluid on the threads of the chickweed it screws on the drill.
- Install the new chuck. Thread the base of the chuck onto the spindle.
- Open the chuck and insert the Allen wrench as you tighten it by hand.
- Insert the screw and tighten it by turning it counterclockwise.
Changing a Keyless Drill Chuck with an Impact Wrench
- Insert a hex socket into the chuck. An impact wrench gives more force than an Allen wrench.
- Tighten the chuck as you hold it in place. If there is an extra screw in the center of the chuck, tighten it. Beware of damaging your chuck or drill due to the force.
- Switch the drill out of gear and the gearbox to the locked position. It should not love either in reverse or forward.
- Spin the hex socket reverse and engage the impact wrench in short bursts until the chuck loosens off the drill.
- Unscrew using your hand and remove the chuck.
Changing a Tapered Drill Chuck
- Measure the diameter of the spindle. Locate the spindle between the chuck base and the drill.
- Get a chuck removal wedge. Take the one with a gap between the two arms larger than the spindle diameter.
- Insert the wedge between the chuck and the drill. The two arms of the wedge should be around the spindle in this gap.
- Hammer the wedge in until the chuck pops off the drill.
- Insert a new tapered chuck. The spindle and chuck should be clean and grease-free. Protect the chuck using a piece of wood. Tap the chuck nose with a mallet until it fits securely onto the spindle.
- Remove the spindle.
- Open the chuck and Place it above the vise jaws.
- Place a metal punch through the center hole.
- Hammer the metal punch until the spindle comes off the drill.
Remove chuck from drill press
Drill press chucks fit into their drill presses differently. The shafts are tapered to fit tightly into the spindles of the drill presses. The Morse taper is the kind of taper used. Remove the drill press chucks when they are bent. Improper installation results in the chuck falling out. Below are installation instructions to follow and the tools needed.
Tools
Chuck removal tool
The chuck revival tool makes the process easy. It removes chucks. The chuck removal tool comes with a shape that fits inside. It has an access window on the spindle of the drill Place. Hammer the chuck removal tool into the spindle and the window push the top of the chuck down until the taper fit loosens. That is when the chuck falls out of the press.
Steps
- Clean the chuck before removal using a soft cloth and acetone.
- Insert the drill chuck into the press.
- Insert the chuck removal tool into the press’ spindle window.
- Hammer the tool into the window, so the chuck falls out of the press.
- Raise the drilling table and make sure the chuck does not get damaged.
- Use a hammer and a piece of hardwood if the tool is unavailable. Avoid damaging the drill chuck.
- Get a hammer and a piece of hardwood.
- Position the hardwood above the chuck at an angle.
- Hit the hardwood as the chuck falls out. The hammer strike’s force must be angled downward to avoid bending the chuck shaft.
- Retract the jaws to prevent damaging the chuck. Lower the press table.
- Strike the chuck with a mallet and remove the chuck.

- Grain and Sheen: Teak Oil versus Danish Oil Uncovered - January 10, 2024
- The Cherry on Top: Crafting the Perfect Cutting Board - January 9, 2024
- Polyurethane Water-Based vs Oil-Based: Choosing the Right Finish - January 8, 2024
