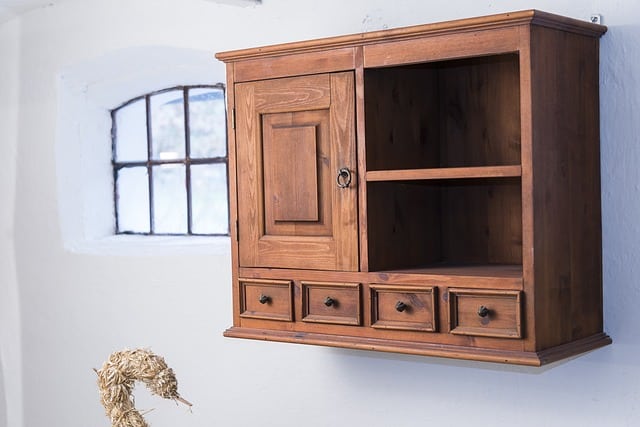
Thinking of updating your kitchen cabinets? Pick a finish you wish to use to protect them from damage. Adding a clear coat to your kitchen cabinets can help make your space brighter and more friendly. For a stunning appearance, a clear coat will do. It protects your cabinets from dirt, scratching, and chipping. It also complements a kitchen with lots of natural light. Natural light can cause paints and other finishes to fade over time.
Clear coats contain UV blockers that help preserve your cabinets’ colors for longer. No messy residue is on your cabinet doors. It will also give rougher surfaces and edges a smooth and shiny finish. In this quick guide, we will go over the benefits of using a clear coat and the factors to keep in mind when selecting your clear coat.
Understanding Clear Coats for Kitchen Cabinets
A clear coat is the coating that embellishes the surface of a cabinet, providing hardness and resistance to different mechanical and chemical agents. It seeks to obtain excellent finish paint during the finishing process.
Adding a clear coat to your kitchen cabinets helps make your space brighter and more friendly. It enhances the stunning appearance and protects your cabinets from dirt, scratching, and chipping. A clear coat finish would be a great choice for a kitchen with natural light.
Types of Clear Coats
A. Water-based Clear Coats
Water Based clear protects surfaces including masonry, concrete, and internal timber. You must cure it for a smooth, washable surface that will keep the surface dry and protect it from stains and spills.
The non-yellowing, clear acrylic top coat is water-reducible, and its self-seal interior product exhibits excellent stain and water-resistant properties on substrates such as wood and plastic. It features long-lasting durability, a variety of products for amber or clear appearances and levels of sheen, less harmful fumes, low odor, and faster dry times.
There is good resistance to heat and abrasion, excellent adhesion, low toxicity and flammability due to low VOC levels (Greenseal.org). The Minwax 13333 Clear Polycrylic is a water-based protective finish that protects and enhances the beauty of interior wood surfaces. Ultimate Spar Urethane protects against UV rays, moisture, and mildew.
B. Oil-based Clear Coats
Oil-based coats feature a hard shell, high build, fewer coats, and slightly brown, golden, or yellow coating. It is self-leveling. Oil-based polyurethane coatings provide excellent abrasion and scratch resistance. That makes them ideal for surfaces that require durability.
Oil-based polyurethane coatings achieve a rich, golden glow in a few coats. Allow extra curing time if you want to apply multiple coats, but you can still get by with just one coat for some lower-impact applications. Amongst the best oil-based clear coat options for kitchen cabinets is the Minwax 244444444 Polycrylic Water Based Protective Finish, Minwax 63200444 Helmsman Spar Urethane, Minwax 40910000 Wipe-On Poly Finish Clear and Watco 63041 Lacquer Clear Wood Finish.
C. Polyurethane Clear Coats
Polyurethane coatings are resilient and can be used in multiple applications as they resist moisture, stains, and chemicals. The versatility of these finishes allows them to work on floors, countertops, cabinets, and furniture.
Combining polyurethane finishes with epoxy primers creates a smooth protective barrier on any surface. It becomes impenetrable to atmospheric elements such as moisture, salts, and ultraviolet light, keeping weathering elements away from the material it is coating. Minwax Polycrylic Finish, Varathane Ultimate Polyurethane, and Watco 63041 Lacquer are the best polyurethane clear coats.
D. Lacquer Clear Coats
A lacquer paint is a clear coating that produces a solid, durable finish. It is chip-resistant, waterproof, and breathable. Lacquers come in a range of colors and clear finishes. The finish remains clear for many years without yellowing.
The formula is much thinner than other finishing products allowing it to penetrate deeper, giving a durable protective seal from the inside out. It maintains its transparency as it ages. Lacquer finishes require very little maintenance. RUST-OLEUM Varathane and MINWAX Polycrylic Protective Wood Finish are some of the best lacquer clear coat options for kitchen cabinets.
Factors to Consider When Choosing a Clear Coat
A. Durability and Protection
The durability of a coat is the resistance of an applied coat product to mechanical exposure. It is measured by assessment of coat film washability, wet abrasion, and scrub resistance. It has to show dried paint film to resist wearing and degradation. It protects kitchen cabinets from moisture, heat, and stains. Always test the finish on a small area before applying it to the entire piece so you see how the finish interacts with the surface.
B. Appearance and Finish
For your kitchen cabinet, one of the biggest choices you can make is finish choices. Gloss and semi-gloss finishes are the most popular finishes available for kitchen cabinets. Failure to differentiate the two can lead to problems down the road. Your choice depends on your style.
Gloss-finish kitchen cabinets have a high shine and smooth surface, whereas semi-gloss offers a balance between a matte finish and a high-gloss look. Both enhance the natural beauty of your kitchen cabinets.
C. Application Process and Ease of Use
The coating can be applied using a brush, roller, or spray gun, providing flexibility based on your preference and project. Applying coating should be a hassle-free process. It goes smoothly and evenly using a brush, roller, or spray gun. Apply with spray cans, spray guns, or airbrushes. Take a moment to find the best buy for your vehicle and budget. Work in the direction of the grain of the wood (Kmtools.com). After it dries, sand lightly, remove all the sanding dust and apply a second coat. For added durability, apply a third coat.
D. Drying Time and Curing
Cleanup should be effortless as it can be done with soap and water, making the process quick and convenient. It should be quick enough to dry within 30 minutes to 1 hour. That way, you can complete your project more efficiently. Cabinets take about 1 – 2 weeks to dry. That is known as dry to the touch. After the paint is dry to the touch, the curing process starts, taking a little longer. That is about a month or thirty days.
Preparing and Applying Clear Coat
A. Surface Preparation
Light sanding will help to smooth out any rough spots or imperfections on the surface. Use fine-grit sandpaper and sand until the wood is smooth to the touch. Use a shop vac to remove dust. Wipe away any remaining dust or debris with a clean cloth.
B. Applying the Clear Coat
- Pick a location.
- Lay a drop cloth to protect your work surface.
- Remove dust from the wood’s surface.
- Apply stain.
- Stir your finish. Shaking this can cause air bubbles that will end up on your finished piece. Over-brushing can also create bubbles (Sherwin-williams.com). Use a high-quality bristle brush, and apply the finish in one direction with the grain to avoid raising wood fibers and hide brush strokes. Remove any drips at the bottom of your wood while still wet. Let the finish fully dry between coats, but that should not exceed any time constraint mentioned in the directions on the can. Exceeding the time constraint requires sanding the finish down before applying the next coat. To avoid sanding between each coat, apply within the time limit for less work. Applying multiple coats of a clear finish can be tricky because the wet finish becomes more difficult to see on top of the dried finish.
Maintaining and Refinishing Clear Coated Cabinets
A. Regular Cleaning and Care
Maintaining the cleanliness and appearance of your kitchen cabinets involves a few simple steps:
- Gentle Cleaning Solution: Create a gentle cleaning solution using white vinegar and hot water. Mix these in equal parts. Dampen a soft cloth with the solution and wipe down the cabinet surfaces. Vinegar’s mild acidity helps dissolve grease and grime. Afterwards, rinse the cabinets with clear water to remove any residue.
- Use pH-Neutral Cleaner: If you prefer an alternative to vinegar, opt for a pH-neutral cleaner. These cleaners are specifically formulated to be gentle on various surfaces, including cabinet finishes. Apply the pH-neutral cleaner as instructed on the product label.
- Dry Thoroughly: After cleaning, ensure you wipe off any excess moisture from the cabinet surfaces using a clean, dry cloth. Preventing prolonged exposure to moisture helps maintain the integrity of the cabinet’s finish and wood.
Avoid the Following:
- Avoid Using Vinegar: While vinegar can be effective for cleaning, it’s advisable not to use it on certain cabinet finishes, particularly those sensitive to acidity. If you’re uncertain about your cabinet’s finish, it’s better to opt for a pH-neutral cleaner instead.
- Steer Clear of Abrasive Cleaners: Refrain from using scouring pads, abrasive sponges, or harsh abrasive cleaners. These can scratch or dull the cabinet’s finish, diminishing its appearance over time.
B. Repairing and Refinishing Clear Coats
How to fix minor scratches and dents on clear-coated cabinets
- Assess the Damage: Begin by examining the clear-coated cabinets to identify the extent of the scratches and dents. If there’s any loose or peeling plastic coating, gently remove it to create a stable surface for the repair.
- Prepare the Surface: Use fine-grit sandpaper to sand the damaged area carefully. The goal is to dull the gloss of the clear coat and create a smooth transition between the exposed wood and the plastic coating. This step helps to ensure a seamless repair.
- Remove Sanding Residue: After sanding, thoroughly vacuum the area to remove any sanding dust. This step is crucial to achieve a clean surface that allows the repair material to adhere effectively.
- Clean the Area: Wipe down the sanded area with a damp cloth to remove any remaining dust or debris. This ensures that the surface is clean and ready for the repair process.
- Apply Repair Solutions: Depending on the severity of the scratches and dents, there are a few options for repair:
a. Filler for Deeper Scratches and Dents: Consider using a wood filler for more substantial damage. Apply the filler to the damaged area, following the product’s instructions. Once dry, sand it gently to achieve a smooth surface that aligns with the surrounding clear-coated area.
b. Touch-up Pen or Clear Coat: You might use a touch-up pen that matches the clear coat for minor scratches. Apply it carefully to the scratched area, then gently sand and blend it to achieve a consistent appearance. Alternatively, you can directly apply a clear coat to the scratched area, feathering the edges to blend seamlessly with the surrounding finish. - Final Steps: Once the repair material has dried and the surface is smooth, you can consider applying one or more coats of clear coat. This helps to further blend the repaired area with the rest of the cabinet’s finish. Allow each coat to dry per the manufacturer’s recommendations before proceeding to the next.
Steps to refinish kitchen cabinets with clear coat
- Set Up Your Workspace: Begin by preparing your workspace. Clear the area around the cabinets, cover nearby surfaces to protect them from drips or splatters, and ensure good ventilation in the room.
- Remove Doors and Drawer Fronts: Remove the cabinet doors and drawer fronts. Label them if needed to remember their positions for reassembly.
- Strip the Old Finish: If the cabinets have an existing finish, you might need to strip it off. Use an appropriate stripping product, following the manufacturer’s instructions. This step helps create a clean surface for the new finish.
- Repair Damaged Areas: Examine the cabinets for any dents, scratches, or other damage. Repair these areas as needed. Fill gaps or holes with suitable filler and sand them to achieve a smooth surface.
- Apply the First Coat: Start by applying the first clear coat. Use a brush, roller, or sprayer based on your preference and follow the recommended application guidelines. Apply a thin and even coat, allowing it to dry according to the product instructions.
- Stain Your Cabinets (Optional): If you wish to add color to your cabinets, this is the stage to apply a wood stain. Choose a stain color that complements your kitchen’s overall design. Apply the stain evenly, wiping off any excess for a consistent finish.
- Apply a Final Protective Clear Coat: Once the stain (if applied) is dry, apply additional coats of clear coat. This step is crucial for achieving a protective layer that enhances the durability and appearance of the cabinets. Follow the manufacturer’s recommendations for the number of coats and drying times between them.
- Reassemble and Enjoy: After the final clear coat has dried and cured, reattach the doors and drawer fronts to the cabinets. Take care when reattaching hardware and ensure everything is aligned properly.
Summary
In conclusion, since you know about the options available, you should know what to look for in topcoats for kitchen cabinets. The best coat combines and matches features to meet your requirements like the Rust-oleum 327864’s is ideal for a simple application.
The Minwax 13333 Polycrylic has an excellent polycrylic protective finish for a long-lasting finish. The Rust-Oleum 287722 model is a standard finish with durability and ease of use. Whatever clear coat finish you choose, gives extra protection to your cabinets. They will not only last longer, but will also enhance the appearance of your kitchen.
Frequently Asked Questions (FAQs)
Can I apply a clear coat over the existing finishes on the kitchen cabinets?
Applying a clear coat over existing finishes on kitchen cabinets is indeed feasible. This approach extends to a range of surfaces like painted, unfinished, or stained wood, effectively providing an extra layer of protection while enhancing cabinet aesthetics.
Prior to clear coat application, assessing the current finish’s condition is vital. Address any indications of peeling, cracking, or damage before proceeding. Thorough surface cleaning and potentially light sanding can aid in ensuring proper clear coat adhesion.
During clear coat application, adhering to the manufacturer’s instructions is paramount. Opting for suitable tools—such as brushes, rollers, or sprayers—facilitates achieving a seamless application. For optimal outcomes, it’s advisable to apply several thin coats rather than one thick layer.
Consider the impact of the chosen clear coat product on the final result. Products vary in sheen, spanning from matte to glossy. Testing the clear coat on a discreet area prior to covering the entire cabinet surface allows for result confirmation.
How long does a clear coat last on kitchen cabinets?
The durability of a clear coat on kitchen cabinets varies based on several factors. A well applied and maintained clear coat will generally last 3 to 5 years or longer. The actual duration depends on factors such as the quality of the clear coat, frequency of use, exposure to moisture, sunlight and heat, and general maintenance.
Routine gentle cleaning and avoidance of harsh cleaners can extend the life of the clearcoat. Regular inspection for signs of wear such as scratches, fading or diminishing gloss will help determine if recoating or refreshing is necessary.
Can I change the sheen of the clear coat after it has been applied?
Of course, you can change the gloss of a clear coat after it has been applied. If you initially applied a certain gloss — matte, satin, or gloss — and later decide to use a different one, you can change the gloss as desired.
Make sure the surface is clean and free of dust or debris before proceeding. Light sanding of the clear coat will improve adhesion for the new coat of desired gloss. After preparation, apply the fresh clear coat with the desired gloss by suitable methods such as brushing, spraying or other.
Remember that the existing clear coat should be in good condition before applying a new coat with a different gloss. If the current clearcoat has flaws, imperfections or signs of wear, it is advisable to correct these problems before applying the new coat for best results.
Is it necessary to sand between clear coat layers?
Sanding between clear coats is usually not required unless the previous coat has defects or imperfections. Sanding between coats is done to create a smoother surface and improve adhesion for the next coat. However, if the previous clear coat has dried without any noticeable imperfections, sanding may be able to be avoided.
If you encounter problems such as dust particles, an uneven texture or stains in the clear coat, it is advisable to lightly sand the affected area before applying the next coat. This way you can smooth the surface and ensure a uniform finish.
In cases where the surface appears flawless and feels smooth after the previous clear coat application, do not sand before proceeding. Trust your judgment and consider the specific condition of the clear coat before deciding if sanding is necessary.
Can I use a clear coat to protect painted kitchen cabinets?
Using a clear coat to protect painted kitchen cabinets can be beneficial. Clear coats provide an extra layer of protection against daily wear, moisture and minor scuffs. When applied properly, they can extend the life of your painted cabinets while maintaining their appearance.
Clear coats come in a variety of formulations, such as water-based or oil-based, and in finishes such as matte, satin or gloss. It’s important to prepare the painted surface so that it’s clean, smooth and free of dust and residue. A light sanding and thorough cleaning will help the clear coat adhere well.
When applying, you must follow the manufacturer’s guidelines. This usually includes using a brush or spray can to apply thin, even coats and avoid drips and bubbles. It’s important to allow each coat to dry thoroughly before applying the next; two to three coats will optimize protection.

- Grain and Sheen: Teak Oil versus Danish Oil Uncovered - January 10, 2024
- The Cherry on Top: Crafting the Perfect Cutting Board - January 9, 2024
- Polyurethane Water-Based vs Oil-Based: Choosing the Right Finish - January 8, 2024
