Wood finishes serve multiple purposes: They improve the esthetics of wood surfaces while protecting them from oils, dirt, and chemicals. In this article, we dive into wood finishing and cover different types of finishes, application techniques, and essential maintenance and safety measures. Discover the art of transforming raw wood into stunning, durable pieces that stand the test of time.
Understanding Wood Staining
Differentiating between wood finishing and wood staining
Purpose differentiates wood staining from wood finishing. Wood stains add color to natural wood, while finishes seal the wood. Wood finish protects it from moisture and sunlight. Wood finishing cleaning, sanding, adding color, and applying a clear finish. Stains and wood finishes are great in making wood appealing and protecting it. However, wood stains do not work as finishes. Wood stain adds color to natural wood, unlike wood finishes that seal the wood to extend its longevity. Stains are thin, although they lose the wet look and fade.
Types of wood stains
- Oil-based wood stain
- Water-based wood stain
- Varnish wood stain
- Gel wood stain
Wood stains are a versatile way to improve the appearance of wood surfaces while preserving their natural beauty. There are several types of wood stains, each with its properties and applications. Here is a brief overview of four common types:
1. Oil-Based Wood Stain:
- Oil-based stains are known for their durability and deep penetration into wood fibers.
- They offer rich, long-lasting color and are ideal for hardwoods like oak and mahogany.
- These stains require longer drying times and emit strong odors due to the solvents used.
2. Water-Based Wood Stain:
- Water-based stains are eco-friendly and low in VOCs (Volatile Organic Compounds), making them safer for indoor projects.
- They dry quickly and come in various colors, making them suitable for various wood types.
- However, they may not penetrate as deeply as oil-based stains, resulting in a lighter finish.
3. Varnish Wood Stain:
- Varnish stains combine the benefits of staining and sealing in one product.
- They offer excellent protection against moisture and UV rays, ideal for outdoor wood surfaces like decks and fences.
- Varnishes can be clear or tinted, allowing you to choose between a natural or colored finish.
4. Gel Wood Stain:
- Gel stains are thick and easy to control, making them an excellent choice for vertical surfaces and intricate woodwork.
- They provide a more even finish on woods with uneven grain patterns.
- Gel stains are available in various colors, making them versatile for projects.
Knowing the properties of these wood stains will help you choose the right stain for your woodworking project. Whether looking for a rich, traditional look or a modern, eco-friendly finish, a wood stain meets your needs.
Factors to consider before choosing a wood stain
- Location of the wood
- Light source
- Wood’s color and texture
- Type of wood
- Number of coats
Choosing the right wood stain is critical to the desired outcome of your woodworking project. To make an informed choice, consider the following factors:
1. Location of the Wood:
- Where will the wood be used or placed? Is it for interior or exterior use?
- For interior applications, you have more flexibility in choosing stains, while exterior wood requires a stain that can withstand harsh weather conditions.
2. Light Source:
- Consider the type and intensity of light that will interact with the wood.
- Natural sunlight and artificial lighting can affect how the stain color appears.
- It’s wise to test stain samples in the actual lighting conditions of the intended space to ensure the desired outcome.
3. Wood’s Color and Texture:
- The natural color and grain pattern of the wood are essential factors.
- Light-colored woods like pine may absorb stains differently than darker woods like walnut.
- The texture of the wood, such as open or closed grain, can also impact how the stain is absorbed and the final appearance.
4. Type of Wood:
- Different wood species have unique characteristics that can influence your stain choice.
- Hardwoods and softwoods absorb stains differently, with some requiring pre-conditioners to achieve an even finish.
- Research how your chosen wood species typically reacts to stains to avoid unexpected results.
5. Number of Coats:
- Determine how many coats of stain you’ll need to achieve the desired color and depth.
- Applying multiple coats can produce a richer, darker finish, while a single coat may provide a more translucent effect.
- Keep in mind that additional coats will extend the drying time between applications.
By considering these factors, you can tailor your wood stain to the specific needs of your project. It’s often a good idea to test samples on a remnant piece of the same wood to make sure the end result meets your expectations. With careful consideration, you’ll be well on your way to finding the perfect wood finish for your project.
Preparing the Wood Surface
Importance of proper wood preparation
The preparation of the wood determines the final finish. Brushing the wood will remove some of the softer parts. If you use colored oil, expose the grain, as the colored oil will stay in the grain. Ensure the wood surface is smooth and clean, as any scratches will be more noticeable after the finish is applied than in bare wood.
Cleaning and sanding techniques
- Prepare the surface first before sanding your wood. Remove all tape or staples from the surface to be sanded.
- Sand in a sequence of two or three sandpapers, moving from coarse to fine.
- Protect yourself from the sanding tools.
- Clean the paper periodically.
- Wipe the cloth over the surface of your wooden workpiece, picking up any stray wood particles.
Filling gaps and defects
Use wood putty to close holes, gaps, and other wood defects. Wood putty fills small holes and damages woodworking and furniture. Apply wood putty after the project has been stained, painted, and sealed. Wood putty can also treat damage on older wooden furniture or molding.
Selecting the Right Finish
Different types of wood finishes
- Shellac
- Varnish
- Lacquer
- Wood stain
Choosing the right wood finish can significantly affect your woodworking project’s appearance, durability and maintenance. Here are brief explanations of the four most common types of wood finishes:
1. Shellac:
- Shellac is a natural resin-based finish that provides a glossy and transparent surface.
- It is often used for fine furniture and woodwork due to its beautiful, traditional appearance.
- Shellac dries quickly and can be easily repaired or refreshed with additional coats.
2. Varnish:
- Varnish is a durable, protective finish in various forms, including polyurethane and spar varnish.
- It offers excellent resistance to water, heat, and abrasion, making it suitable for outdoor projects and items subjected to heavy wear.
- Varnish can be clear or tinted, allowing you to choose the level of color enhancement.
3. Lacquer:
- Lacquer is a fast-drying, solvent-based finish known for its high-gloss and smooth appearance.
- It provides a hard and durable surface but may require more care to apply correctly due to its quick drying time.
- Lacquer is often used for musical instruments and fine cabinetry.
4. Wood Stain:
- Wood stain is a finish and a way to color the wood while partially or completely preserving its natural grain.
- Stains come in various types, including oil-based, water-based, and gel stains, each with unique application characteristics.
- Stains often highlight the wood’s grain pattern while adding color.
Knowing the characteristics of these wood finishes will help you choose the most appropriate one for your project. Consider factors such as the type of wood you’re working with, the desired appearance of the finish and the level of protection required to make an informed decision.
Factors to consider when choosing a wood finish
- Wood type
- Wood finish durability
- Your budget
- Ease of use
- Drying time
- Health hazards
Choosing the right wood finish is a crucial step in woodworking, and several factors should influence your decision. Here is a closer look at each factor:
1. Wood Type:
- Different wood species absorb finishes differently, impacting the final appearance.
- Some woods, like oak or cherry, have prominent grain patterns that can be enhanced with the right finish, while others, like pine, may require additional preparation.
- Consider the unique characteristics of your wood to achieve your desired finish.
2. Wood Finish Durability:
- The durability of a finish varies widely between types. For example, varnish offers excellent durability and protection, making it suitable for high-traffic areas and outdoor projects.
- On the other hand, some finishes, like shellac, may require more frequent reapplication due to their lower resistance to wear and moisture.
3. Your Budget:
- Different wood finishes come at varying price points.
- High-quality finishes, such as marine-grade varnish, can be more expensive but provide long-lasting protection.
- Consider your budget and balance it with the durability and aesthetics you desire.
4. Ease of Use:
- Some finishes are easier to apply than others. For example, water-based finishes are generally more user-friendly due to lower toxicity and easier cleanup.
- Others, like lacquer, may require more skill and specialized equipment for a smooth application.
5. Drying Time:
- Drying times can vary significantly between finishes.
- Oil-based finishes tend to dry slowly, allowing for more extended work times and easier strokes blending.
- Conversely, lacquer dries very quickly, requiring a fast and precise application.
6. Health Hazards:
- Consider the potential health hazards associated with the finish you choose.
- Some finishes, like those containing strong solvents, can release harmful fumes during application.
- Ensure you have proper ventilation and protective gear if working with potentially hazardous finishes.
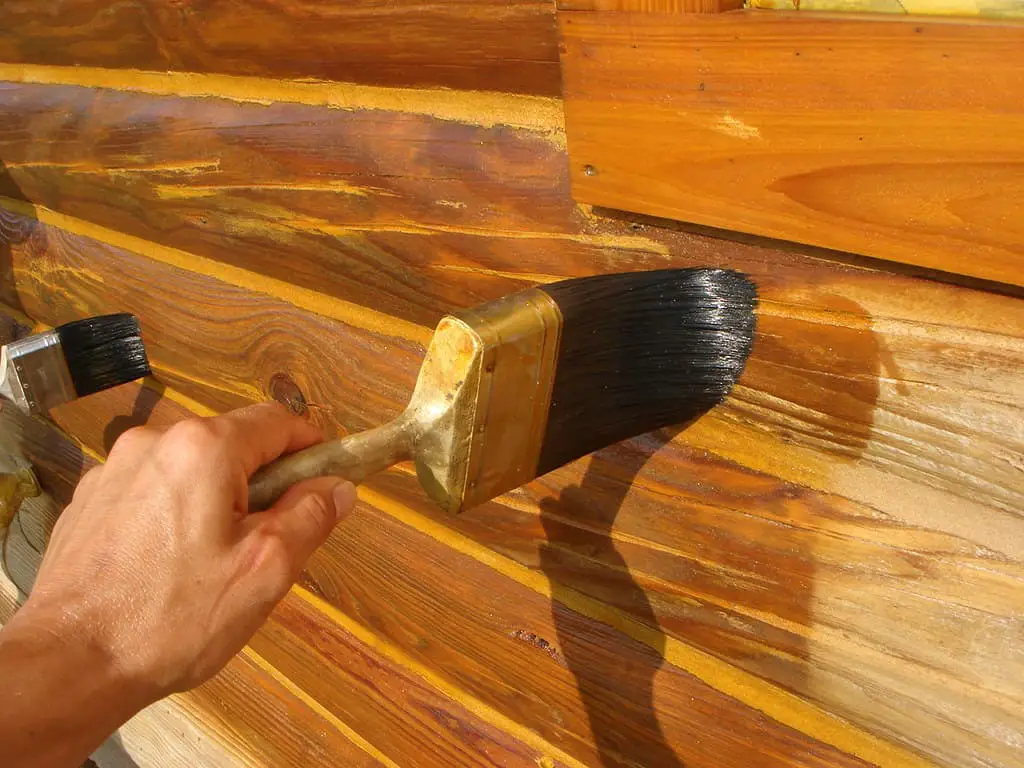
Applying Wood Stain
Choosing the right application method
When choosing the right application method, consider the drying time. A long drying time is required for linseed oil-based stains. It must be easy to apply and must not be toxic and odorous.
A step-by-step guide to applying wood stain
- Sand the wood.
- Stir your stain.
- Apply the stain with a paintbrush or clean rag.
- Wipe off excess stains. Allowing the wood stain to sit longer will result in a darker color. Water-based stain dries fast and should be wiped off within two minutes of application.
- Let the wood dry before applying a sealer.
- Clean up.
Techniques for achieving desired results
- Let the stained wood dry completely.
- First, remove any dust.
- Match stain and surface.
- Sand.
Enhancing Wood Grain
Highlighting the natural beauty of wood
Wood stains are wood coatings that highlight the natural beauty of wood. The stains color wooden surfaces, and keep the wooden structure visible, improving the appearance.
Wood grain enhancement techniques
The best method for bringing out the natural features of the wood grain is using a penetrating oil like Tung oil, Walnut oil, or double-boiled Linseed oil. Rub a wood grain enhancer against the grain to open the pores. That will help to bring out the wood grain texture.
Choosing the right tools for the job
Use the right product to keep your wood looking great for years. Oil-based enhancers perform better. Ensure you have the thick and thin stripper, sandpaper, power sander, good quality rag cloth, natural bristle brush, and spraying equipment.
Troubleshooting Common Issues
Dealing with blotching and uneven staining
To get rid of blotching, remove the stain by stripping, sanding, and starting over. Apply a wash coat of shellac and the wood stain. For mild blotching, use a glaze to soften the contrast between the deeply colored and lighter areas. Before you reapply the wood stain, seal the wood surface with dewaxed shellac. It will help to ensure an even application of wood stain.
Fixing streaks and drips
To get rid of these, apply a sufficient amount of stain and hide stain marks with wood stain. They are a result of excess wood stains and using non-smooth brushes.
Addressing color inconsistencies
Color inconsistencies are a result of the type of wood used. That is why you should pay attention to the hardness and undertones of the wood. Reapply the stain on lighter parts or sand, and reapply the wood stain on darker parts.
Advanced Wood Finishing Techniques
Layering and glazing techniques
Apply wood glazes over painted or stained wood for an antiqued effect. It features a thicker consistency than paint, imparting a smooth, stiff, polished surface to wood surfaces.
Creating depth and dimension with multiple finishes
Although you may opt to have multiple finishes on your wood piece, they should match. For better results, pick a dominant wood tone, match the undertones, play with contrast, create continuity with the finish, break it up with a rug, and repeat.
Distressing and antiquing methods
Methods for antiquing furniture include sanding, painting, waxing, distressing, staining, and sealing. Sand and clean the surface before you apply wax. Use different Grits of sandpaper to achieve the look you want.
Finishing Specific Wood Types
Oak: Tips and tricks for finishing oak wood
Attractive finishes can be easy to get. Sand all parts to 120 grit before finishing, then vacuum and wipe them dust-free. Wait two hours between coats of water-based finishes, and overnight for oil-based finishes before recoating between each topcoat, scuff-sand with 320 grit.
Pine: Techniques for staining pine wood
Polyurethane is the best topcoat for pine wood. Sand wood with fine-grit sandpaper until smooth and wipe clean with a tack cloth. Apply pre-stain wood conditioner along the grain with a clean cloth or paint brush for better results.
Mahogany: Enhancing the beauty of mahogany wood
Danish oil protects the Mahogany wood from moisture, extreme weather conditions, dents, and scratches. It is one 9f the best enhancers that highlight the natural color of the Mahogany wood grain by improving its appearance.
Finishing Interior Wood
Techniques for finishing furniture
- Sanding
- Polishing
- Staining
Achieving a flawless finish on your furniture pieces requires skills and techniques. Here we present three basic methods that play a crucial role in the surface treatment of furniture:
1. Sanding:
- Sanding is the initial step in preparing your furniture for finishing. It involves using abrasive materials, such as sandpaper or sanding blocks, to smooth the wood’s surface.
- Proper sanding removes imperfections like scratches, dents, and uneven surfaces, ensuring an even finish application.
- Start with coarse-grit sandpaper to tackle major imperfections and progressively move to finer grits for a smoother surface.
- Always sand in the direction of the wood grain to avoid creating visible scratches.
2. Polishing:
- Polishing is the process of enhancing the surface of your furniture to achieve a glossy and reflective finish.
- This step typically involves polishing compounds or fine abrasives, applied with a soft cloth or a polishing machine.
- The choice of polish and technique depends on the desired level of shine. For high-gloss finishes, multiple polishing stages may be necessary.
- Polishing not only adds luster to the wood but also provides a protective layer against moisture and wear.
3. Staining:
- Staining adds color to the wood while preserving its natural grain and texture.
- Wood stains come in various types, including oil-based, water-based, and gel stains, each with unique characteristics.
- To apply a stain, use a brush, cloth, or sponge, and follow the wood’s grain direction for even color absorption.
- Testing the stain on a scrap piece of the same wood is essential to ensure it achieves the desired color before applying it to your furniture.
These basic techniques form the basis for successful furniture finishing. Depending on the specific needs of your project and the level of customization you are seeking, you can also apply additional techniques such as sealing, varnishing or waxing to enhance further and protect the appearance of your furniture.
Staining and sealing wooden floors
Ensure that the floor will take the stain well. Run a test and sand the floor. Make sure you clean up the dust. Protect the finish with polyurethane sealer. Follow the grain of the wood when applying the polyurethane.
Enhancing woodwork and cabinetry
Cabinet makers want a clean, neat, and straight-finished product. Hide fasteners used during construction and cap the cabinet with a small plywood sheet. That will reduce the need to use putty to fill those fastener holes.
Exterior Wood Finishing
Protecting wood from outdoor elements
Use a sealer, paint, or varnish to protect your wood. A sealer is a transparent finish applied to wood to protect it from moisture. It penetrates the wood’s pores and prevents water from entering.
Finishing wooden decks and patios
Try a wood finish that is easy to apply and protects against the elements. Use high-quality paint for durability. Choose the right materials for long-lasting results.
Refinishing exterior doors and windows
Remove the door from its hinges and the hardware. Sand flat surfaces, scrape moldings, and detail work. Sand grooves and edges. Seal and Finish both edges. Apply finish and more coats if necessary.
Maintaining and Caring for Finished Wood
Tips for long-term wood maintenance
- Regularly clean and dust it
- Use a soft moist cloth to remove dirt from the material
- Make repairs
- Minimal exposure to heat
- Apply wax
- Remove tough stains
- Avoid pressure washing
To maintain the beauty and integrity of wooden furniture and surfaces in the long term, it requires regular care and attention. Here are important tips to ensure the longevity and attractiveness of your wooden furniture:
1. Regularly Clean and Dust It:
- Dust can accumulate on wood surfaces, dulling their appearance and potentially causing scratches.
- Use a soft, lint-free cloth or a microfiber duster to remove dust regularly gently.
- Avoid abrasive materials or harsh cleaners that can damage the wood’s finish.
2. Use a Soft Moist Cloth to Remove Dirt:
- A soft, damp cloth effectively cleans the surface for light dirt and smudges.
- Ensure the cloth is only slightly moist to prevent excessive moisture from penetrating the wood.
3. Make Repairs:
- Address any minor issues promptly, such as loose joints, small chips, or scratches.
- Glue loose parts back together, fill small chips with wood filler, and touch up scratches with matching finish or a touch-up marker.
4. Minimal Exposure to Heat:
- Avoid placing wood furniture directly in front of heating vents, radiators, or in direct sunlight for extended periods.
- Extreme heat can cause wood to warp, crack, or fade over time.
5. Apply Wax:
- Waxing your wood furniture provides an additional protective layer and enhances its natural sheen.
- Use a high-quality furniture wax and follow the manufacturer’s instructions for application.
6. Remove Tough Stains:
- Act quickly to remove spills and stains to prevent them from penetrating the wood.
- A mixture of baking soda and water or a specialized wood stain remover can be effective for tough stains like ink or red wine.
7. Avoid Pressure Washing:
- Never use a pressure washer to clean wood surfaces, as the high-pressure water can damage the wood, strip away finishes, or force water into joints.
By following these care tips, you can extend the life of your wood furniture and keep it looking great for years to come. Remember, proper care and preventative measures are key to maintaining the natural beauty and functionality of wood in your home.
Cleaning and preserving finished wood
The best way to preserve your wood finish is to dust it weekly with a slightly damp microfiber cloth. Remove any dust and dirt. Use oil soap to remove grime from old wood furniture. Use additional protection on your varnished surfaces in paint or wood seal.
Repairing minor damages to wood finishes
Use a sharp craft knife to remove any loose finish on your wood surface. Be careful as you scrape the damaged spot using a sharp knife. Sanding allows the stain to penetrate the pores of the wood surface.
Environmentally-Friendly Wood Finishing
Eco-friendly wood finish alternatives
Several eco-friendly alternatives offer both beauty and sustainability for those looking to minimize their environmental impact while finishing wood projects. Here are some eco-conscious options to consider:
- Walnut oil.
- Tung oil.
- Raw linseed oil.
- Safflower oil.
- Denatured alcohol.
- Clay fillers.
- Shellac flakes.
1. Walnut Oil:
- Walnut oil is a natural, food-safe finish that enhances the wood’s natural color and grain.
- It’s easy to apply and provides a warm, matte finish.
- Walnut oil suits cutting boards, wooden utensils, and indoor furniture.
2. Tung Oil:
- Tung oil, extracted from the seeds of the tung tree, is a durable and water-resistant finish.
- It dries to a soft sheen and is often used for fine woodworking projects.
- Tung oil is particularly well-suited for outdoor furniture due to its weather-resistant properties.
3. Raw Linseed Oil:
- Raw linseed oil is a classic wood finish known for its affordability and ease of use.
- It penetrates the wood, enhancing its appearance while providing protection.
- Remember that raw linseed oil dries slowly, so be patient during curing.
4. Safflower Oil:
- Safflower oil is a less common but eco-friendly option that provides a subtle, low-sheen finish.
- It is relatively odorless and dries without yellowing, making it suitable for lighter woods.
5. Denatured Alcohol:
- Denatured alcohol can be used as a solvent or thinner for shellac, making it a versatile and eco-friendly choice.
- It evaporates quickly, leaving behind a shellac finish that enhances wood’s natural beauty.
6. Clay Fillers:
- Clay fillers are a sustainable way to fill gaps, cracks, or imperfections in wood.
- They are non-toxic, easy to work with, and can be stained or finished to match the wood.
7. Shellac Flakes:
- Shellac is a natural resin-based finish made from secretions of the lac beetle.
- Shellac flakes can be dissolved in denatured alcohol to create a glossy and protective coating finish.
- It’s a renewable resource, making it an eco-conscious choice.
These eco-friendly alternatives for wood finishes not only provide a beautiful and protective finish, but also contribute to a more environmentally friendly approach to woodworking. Always follow the manufacturer’s instructions when using these alternatives for best results and a lasting finish.
Sustainable wood finishing practices
Biobased Wood Finish, Mineral oil, and linseed oil are tried-and-true, affordable, readily available wood finishes.
Benefits of using non-toxic finishes
- Less environmental impact
- Ideal for those with allergies and chemical sensitivities
- Low-volatile organic compounds
- No hazardous waste
Opting for non-toxic wood finishes offers several benefits beyond just esthetics. Here’s a closer look at the benefits:
1. Less Environmental Impact:
- Non-toxic finishes are typically made from natural and renewable resources, reducing the demand for harmful chemicals and unsustainable materials.
- They produce fewer emissions during manufacturing and application, contributing to a healthier planet.
2. Ideal for Those with Allergies and Chemical Sensitivities:
- Non-toxic finishes contain fewer, if any, volatile organic compounds (VOCs) and other harmful chemicals.
- This makes them a safer choice for individuals with allergies, asthma, or chemical sensitivities, as they reduce the risk of adverse reactions.
3. Low-Volatile Organic Compounds (VOCs):
- VOCs are chemicals that can vaporize into the air, leading to indoor air pollution and potential health issues.
- Non-toxic finishes have minimal to no VOC content, ensuring healthier indoor air quality and a safer environment for occupants.
4. No Hazardous Waste:
- Traditional finishes often require hazardous waste disposal due to their toxic components.
- Non-toxic finishes generate less hazardous waste during production and cleanup, reducing the burden on waste management systems.
5. Sustainable and Renewable Sources:
- Many non-toxic finishes are derived from sustainable and renewable resources like plant-based oils or resins.
- This promotes responsible forestry and agriculture practices, contributing to a more eco-friendly industry.
6. Comparable Performance:
- Non-toxic finishes can deliver performance comparable to traditional finishes, offering durability and protection for wood surfaces.
- They can resist moisture, wear, and UV damage while preserving the wood’s natural beauty.
By choosing non-toxic wood finishes, you not only protect your health and indoor environment but also make a positive impact on the broader ecosystem. These finishes provide a responsible and sustainable way to enhance and protect wood surfaces without compromising quality or aesthetics.
Safety Precautions and Best Practices
Protective measures when working with wood finishes
- Wear safety glasses or a face shield.
- You should have enough light for visibility.
- Always keep your eyes on the cutting action.
Ensuring your safety and well-being should be a top priority when working with wood finishes. Here are some important protective measures to keep in mind:
1. Wear Safety Glasses or a Face Shield:
- Protective eyewear is crucial to shield your eyes from potential splashes, drips, or fumes associated with wood finishes.
- Ensure your safety glasses or face shield meet ANSI (American National Standards Institute) standards for eye protection.
2. Provide Adequate Lighting:
- Proper lighting is essential for visibility when working with wood finishes.
- Insufficient lighting can lead to accidents and hinder your ability to apply finishes accurately.
- Consider using task lighting to illuminate your workspace effectively.
3. Always Keep Your Eyes on the Cutting Action:
- While this advice is relevant for woodworking involving cutting tools, it’s essential to always focus on your work.
- Distractions or inattention can lead to accidents or errors during the finishing process.
4. Use Appropriate Ventilation:
- Proper ventilation helps dissipate fumes and airborne particles created by wood finishes.
- If you’re working in an enclosed space, consider using a well-functioning exhaust fan or a respirator with the appropriate filter for chemical protection.
5. Wear Protective Clothing:
- Long-sleeved shirts, long pants, and gloves can protect your skin from contact with finishes.
- Choose clothing you can easily clean or dispose of if it becomes contaminated.
6. Work in a Well-Ventilated Area:
- Work outdoors or in a well-ventilated workspace like a garage with doors or windows open whenever possible.
- Adequate airflow helps disperse fumes and reduces the risk of inhaling harmful vapors.
7. Store Finishing Materials Safely:
- Store wood finishes, solvents, and chemicals in original containers and in a cool, dry place away from direct sunlight and heat sources.
- Keep them out of reach of children and pets.
8. Follow Manufacturer’s Instructions:
- Always read and adhere to the manufacturer’s instructions on the product labels.
- This includes recommended safety precautions, application techniques, and cleanup procedures.
Remember that safety is paramount when working with wood finishes. By following these protective measures and exercising caution, you can enjoy the creative process of finishing wood while minimizing the risk of accidents or health hazards.
Proper ventilation and disposal of chemicals
Label all containers of hazardous chemicals. Also, use extraction ventilation and RPE in restricted spaces. During some woodworking activities, wear a mask, so that solid particles will not hit your face. It prevents you from breathing in dust or toxic fumes.
Avoiding common health hazards
Woodworking can lead to injuries, diseases, and even death. To avoid this, regularly clean the entire workroom, including all machines, and control fire hazards, and safety wear.
Conclusion
In summary, purpose makes the difference between wood stain and wood varnish. Apply both to get a more durable project. Wear masks and other protective clothing for safety reasons. Stay away from chemicals and ventilate the work area. Apply the tips and tricks to complete a safe and successful project.
FAQs
How long should I wait before applying a second coat of wood stain?
The timing for a second coat of wood stain depends on several factors, such as the type of stain used, environmental conditions, and the depth of color desired. As a general guideline, however, it can be said that:
- Wait Around Four Hours:
- Waiting approximately four hours between coats is a good starting point.
- This allows the first coat to set, creating a base for more layers.
- Check Manufacturer’s Instructions:
- Always follow the stain product’s instructions.
- Some stains may need shorter or longer drying times between coats.
- Consider Environmental Factors:
- Temperature, humidity, and airflow affect drying times.
- Warmer, drier conditions speed up drying, while cooler or humid conditions may slow it down.
- Perform a “Tack Test”:
- Before applying the next coat, do a “tack test.”
- Gently touch the stained surface with a lint-free cloth or fingertip.
- If it feels tacky or comes off, wait longer.
- It’s likely ready for the next coat if it feels dry and smooth.
- Achieve Desired Color:
- More coats can deepen the color.
- Apply extra coats with appropriate drying times for a darker shade.
- Consider Light Sanding:
- Some woodworkers lightly sand between coats with fine-grit sandpaper.
- Sanding smooths the wood, improving the finish.
Remember, patience and attention are key when staining wood. Rushing can lead to inconsistent results. Follow the product’s instructions and test the glue to ensure the next coat is ready.
Can I mix different wood stains to create custom colors?
You can mix wood stains to create custom colors for your woodworking projects. However, there are some important considerations to keep in mind:
1. Compatibility of Stains:
- When mixing stains, ensure that the stains you’re combining are compatible. Stick to stains that share similar bases, such as both being oil-based or water-based. Mixing different types may not yield the desired result.
2. Undertones and Color Families:
- The key to successful color mixing lies in understanding the undertones of the stains. Stains with undertones in the same color family are more likely to blend well.
- For example, if you want to create a custom shade of brown, mixing a stain with warm reddish undertones and another with cooler grayish undertones may result in an uneven or unexpected color.
3. Testing and Adjusting:
- Before applying the custom mix to your project, it’s essential to conduct a test on a scrap piece of wood.
- Mix small amounts of the stains and adjust the proportions until you achieve the desired color.
- Keep a record of the proportions used to recreate the color in case you need it for future touch-ups.
4. Consistency in Mixing:
- Aim to maintain consistency throughout when mixing larger quantities for an entire project.
- Ensure thorough mixing to distribute the pigments evenly and prevent streaks or variations in the finish.
5. Record Your Custom Formula:
- If you’ve created a unique color blend you love, note the stain brands, types, and proportions used.
- This will enable you to recreate the custom color if needed.
Mixing wood stains can be a creative way to achieve custom colors. However, it’s important to proceed cautiously and test your mixes to ensure they meet your expectations. By experimenting carefully, you can achieve unique and custom finishes for your woodworking projects.
Should I use a brush or a cloth to apply the wood stain?
When applying wood stain, whether to use a brush or a cloth depends on several factors, including the project type, the desired finish, and personal preference. Each method has its advantages and considerations:
1. Cloth Application:
- Using a cloth, such as a lint-free cotton rag or an old T-shirt, is a popular choice for many woodworkers.
- Advantages:
- Cloth allows for better control and precision when applying stain.
- It’s particularly useful for small or detailed projects.
- Cloth can help you achieve an even and consistent finish.
- Considerations:
- Applying stain with a cloth might require more effort, especially on larger surfaces.
- You may need to wear gloves to protect your hands from staining.
2. Brush Application:
- Brushes, like foam brushes or bristle brushes, are another common tool for applying wood stain.
- Advantages:
- Brushes are efficient for covering larger areas quickly.
- They are a good choice for rough or textured wood surfaces.
- Brushes can work stain into tight corners and crevices effectively.
- Considerations:
- Brushes may leave brush marks or streaks if not used carefully.
- Controlling the amount of stain applied can be more challenging with a brush.
- Proper brush selection (foam vs. bristle) depends on the type of stain and wood.
3. Personal Preference:
- Ultimately, the choice between a cloth and a brush may come down to personal preference and the specific requirements of your project.
- Some woodworkers prefer the tactile control of a cloth, while others appreciate the speed of a brush.
4. Techniques and Experience:
- Your familiarity with each method and your staining techniques also play a role in the decision.
- Experiment with both methods on scrap wood to determine which one you are more comfortable with and which delivers the desired results.
How can I remove an old wood finish before applying a new one?
When it’s time to refresh the look of your wood surface by applying a new coat of paint, it’s important to properly remove the old coat to ensure a smooth and durable finish. Here are step-by-step instructions to help you do just that:
1. Gather Your Tools and Materials:
- You’ll need a few tools and materials for this task, including a metal scraper, sandpaper (various grits), paint thinner or stripping solution, a paintbrush, and safety equipment such as gloves and goggles.
2. Ensure Adequate Ventilation:
- Perform this task in a well-ventilated area or outdoors to minimize exposure to fumes from the stripping solution.
3. Test the Stripping Solution:
- Before applying any stripping solution, test it on a small, inconspicuous area of the wood to ensure it won’t damage or discolor the surface.
4. Apply the Stripping Solution:
- Following the manufacturer’s instructions, apply the stripping solution generously to the old finish using a paintbrush.
- Allow it to sit for the recommended time to soften the finish.
5. Scrape Away the Old Finish:
- Use a metal scraper or putty knife to scrape away the softened old finish gently.
- Work in the direction of the wood grain to avoid damaging the wood.
- Be patient and take care not to gouge or scratch the wood surface.
6. Repeat as Needed:
- In some cases, you may need to repeat the stripping and scraping process to remove all layers of the old finish thoroughly.
- Stubborn areas may require additional attention.
7. Sand the Surface:
- After removing the old finish, sand the wood surface with progressively finer grits of sandpaper.
- Start with a coarse grit to remove any remaining traces of old finish and gradually move to finer grits for a smooth surface.
8. Clean and Prepare for the New Finish:
- Thoroughly clean the wood to remove any dust or residue from the stripping process.
- Now, you’re ready to apply your new wood finish according to the manufacturer’s instructions.
9. Dispose of Waste Properly:
- Be mindful of the environmental impact when disposing of old finish, paint thinner, or any materials used in the process. Follow local disposal guidelines.
By following these steps, you can effectively remove the old wood finish and prepare your wood surface for a fresh and beautiful new coat. If you take your time and use the right tools and materials, you will get the best results.
Can I use the same finish for interior and exterior wood?
When it comes to choosing a wood finish, it’s essential to understand the key differences between finishes designed for interior and exterior use. Here’s a more detailed explanation:
1. Interior Wood Finish:
- Interior wood finishes are formulated primarily for indoor use.
- They are designed to enhance the appearance of wood surfaces while providing some protection against wear and stains.
- Interior finishes often come in various forms, including wood stains, varnishes, shellacs, and oils.
- These finishes may not withstand exposure to the elements, moisture, or harsh UV rays.
2. Exterior Wood Finish:
- Exterior wood finishes, on the other hand, are specifically engineered to endure outdoor conditions.
- They offer robust protection against moisture, sunlight, temperature fluctuations, and other environmental factors.
- Common types of exterior wood finishes include exterior stains, spar varnishes, and specialized outdoor sealers.
3. Compatibility:
- Interior and exterior wood finishes are not interchangeable due to their distinct formulations and purposes.
- Using an interior finish on exterior wood will likely lead to premature wear, fading, and wood damage.
4. Sealing for Added Protection:
- When finishing exterior wood, it’s often recommended to apply a clear polyurethane or varnish as a topcoat.
- This additional layer provides extra protection against the elements and UV radiation.
- Ensure that the topcoat you choose is designed for exterior use to maintain the wood’s integrity.
Useful tools and products for wood finishing
To achieve a beautiful and durable wood finish, you need the right tools and products. Below is an overview of the most important products to have in your woodworking toolbox:
- Thick and thin stripper
- Sandpaper
- Power sander
- Rag cloth
- Bristle brush
- Spraying equipment
1. Strippers (Thick and Thin):
- Thick Stripper: Thick or gel-based stripping agents are excellent for removing multiple layers of old paint, varnish, or finish.
- Thin Stripper: Thin or liquid strippers are ideal for light paint or finish removal and are often easier to work with on intricate surfaces.
2. Sandpaper:
- Sandpaper is available in various grits, from coarse to fine.
- Coarse grits are used for initial sanding to remove imperfections, while finer grits smooth the wood surface.
- Sandpaper is crucial for preparing the wood and achieving a smooth finish.
3. Power Sander:
- A power sander, such as an orbital sander or a random orbital sander, can speed up the sanding process.
- It’s especially useful for large projects and ensuring an even surface.
4. Rag Cloth:
- Lint-free cloth or rags are essential for applying wood finish evenly and wiping away excess.
- They help achieve a clean, streak-free finish.
5. Bristle Brush:
- Bristle brushes come in various types, including natural bristle and synthetic bristle.
- They are used for applying wood stains, paints, and clear finishes.
- Natural bristle brushes are often preferred for oil-based finishes, while synthetic bristle brushes work well with water-based products.
6. Spraying Equipment:
- Spraying equipment, such as paint sprayers or HVLP (High Volume, Low Pressure) sprayers, can provide a smooth and even application of finishes.
- They are excellent for large surfaces like furniture or cabinets.
- Proper setup and technique are essential for achieving professional results with spraying equipment.
7. Safety Gear:
- Don’t forget essential safety gear like safety glasses, gloves, and a dust mask or respirator.
- Safety gear protects you from harmful fumes, dust, and potential splatters during the finishing process.
8. Clean-Up Supplies:
- Have cleanup supplies like paint thinner, mineral spirits, or water (depending on the finish type) for cleaning brushes and equipment.
9. Tack Cloth:
- A tack cloth is a sticky cloth used to remove fine dust particles from the wood surface before applying the finish, ensuring a smoother result.
Having these tools and products on hand will help you achieve professional-looking wood finishes. Remember to follow the manufacturer’s instructions for each product and take proper safety precautions to ensure a successful and safe wood finishing project.

- Grain and Sheen: Teak Oil versus Danish Oil Uncovered - January 10, 2024
- The Cherry on Top: Crafting the Perfect Cutting Board - January 9, 2024
- Polyurethane Water-Based vs Oil-Based: Choosing the Right Finish - January 8, 2024
