Woodturning pens is a fun hobby that does not require a lot of equipment. You don’t need a fancy lathe or a huge collection of wood-turning tools to turn pens. All you need is a pen blank, a pen mandrel, a pen turning tool, pen turning glue, pen marking tool, pen turning stain, and a few other items.
Getting started pen turning
Beginners have an easy time investing in a pen turning kit, which includes all of the tools necessary for just about anything you would ever want to do to a pen. Carbide insert tools are the training wheels of turning as they are easier to master than traditional turning tools. They have a longer working life because they have higher resistance to wear.
Familiarise yourself with the essential tools needed. Gather chisels, a pen mandrel, a barrel trimmer, a pen tube insertion tool, a pen press, and any tool that can drill. Your supplies include pen kits, pen blanks, glue, sandpaper, and finishes.
Making pens on a lathe
- Gather your supplies including a Lathe, skew, wood CA glue or Super Glue, Mandrel, sandpaper, Pen Kit, paper towels, boiled linseed oil, drill press, and clamp.
- Move on to cutting the blanks. Take a piece of wood called a blank. You can have any wood long enough for the tubes to fit in the wood. Cut the wood so that the wood will be long enough for tubes. Put on your safety glasses and use a Craftsman table saw to cut the wood or a scroll saw. Measure twice, cut once.
- Drill blanks on a drill press, Lathe, or hand drill. Avoid drilling this hole on a standard drill because it is square. The drilling on a drill press is simple. Drilling on a lathe can be done with a supernova chuck and a drill attachment.
- Sand the blanks so that they are not shiny, and then apply a line of thick CA glue to the tube and push it to the blank. Pull and twist the blank so that the glue gets all over the inside of the hole. Repeat on the other side. Push in the tube so that it is not sticking out of either side of the wood.
- Use the appropriate tool for squaring the blanks or sandpaper and a square. That makes the wood flush and square with the tubes. Do not drill down too far because the tube will stick out, and in the final, you will have a gap in the joint of the pen.
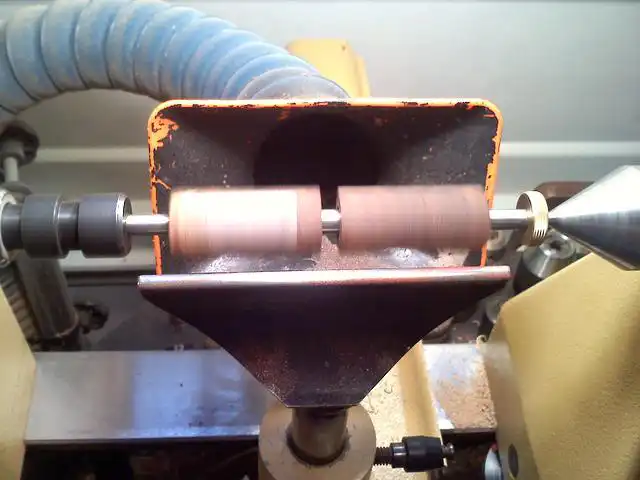
- When your woos lathe has speed control, make it as fast as possible. Use a round tip, a gouge, or a chisel on a skew. Take your Mandrel and bushings and put the blanks on there. There is a bushing, blank, bushing, blank then bushing. The bushings guide how much you turn down the wood. Always take off more and turn as smoothly as possible.
- You can now make your way up to 400 grit then look at your blanks. Run your fingers on the blank with the wood lathe on as you assess your sanding. You can tell a lot with your fingers than your eyes. After your blank is smooth and flush with the bushings take your Boiled Linseed Oil. Put some on a paper towel and rub it on your pen.
- Take your CA glue and make sure it is as smooth as possible and even. Take your glue and paper towel and put the paper towel on the bottom of the pan, squeeze the glue and smooth out the ridges. The paper towel does get hot and does smoke. Do not take away the paper towel too fast because it will look bad. Do not have it on too long because the glue will be set up and stick to the pen. You can have as many coats as you want to depend on how smooth the blanks are.
- After the CA finish, you will see that the blanks are shiny. Take 400 grit sandpaper and get rid of all the shiny spots and a Micro-Mesh sanding system and sand from 1,500 grit to 12,000 grit. Turn off your wood lathe and sand back and forth horizontally while turning the wood lathe by hand. That will get rid of sanding and tool lines.
- After Micro-Mesh you need to tale out your Beall buffing and finishing system. The process starts with tripoli, then white diamond then the carnauba wax. Load these with the finish by turning on your wood lathe and rubbing the bars onto the wheels. While the lathe wheels are spinning, twist and turn your blanks in the wheels. That is for an even and thick coat. Take the blanks off the mandrel and get out the pen press or clamp. Check the blanks to see if there are imperfections set that blank to the side and the other one, and press the tip into one end.
How to turn pens
- Draw a line along one face of your blank, and mark the cap end with an arrow to help you realign the parts.
- Draw a pair of intersecting lines on the ends of both blanks from corner to corner to determine the centre points. Check that your drill press table is perpendicular to the chuck, hold the blank in the clamp, and drill.
- Scuff-sand the brass barrels with a fine-grit sandpaper. Mix a small batch of 5-minute epoxy, and then coat the outside of the brass tube.
- Allow the epoxy time to cure, square both ends of both blanks.
- Insert the mandrel into the headstock, and then sandwich the blank between two bushings. Secure the assembly with the locknut. Slide the tailstock and live centre against the mandrel’s free end.
- Adjust your tool to rest parallel and closer to your work, and rotate the blank by hand so that it does not touch. Set the lathe to 1,000 RPM, and round the blank with a roughing gouge. Set the lathe to 1,500-2,000 RPM and continue shaping the blank.
- Remove tool marks and shape the ends of the blanks flush to the adjacent bushings.
- Turn the lathe off and apply a small amount of finish to a small piece of cloth or paper towel. Apply additional coats until you achieve the desired sheen.
- Inspect the brass tubes so that they are free from any clogs that might prevent assembly.
How to make wooden pens
- Get your pen set and a woodblock.
- Cut the woodblock in half.
- Draw a line from corner to corner and form an X at the end of the block. Clamp to hold the wood in place as you drill through the X.
- Coat the brass casing with super glue. Turn the block over and press it against something flat. Let it dry for an hour.
- Shave the excess wood off until you reach the brass casing.
- Place the wood block on the mandrel and set it in the lathe. Start the wood lathe and place it on the lowest speed to shave off the corners of the blocks. Shave off small pieces of wood. Round down the corners, and it will become easier and faster to shave more off.
- Get some 80 grit sandpaper and sand the wood until it is even with the metal. Smooth out any marks left by the 80 grit sandpaper.
- Using Hut wax, place it on the wood while it is turning. That wax will buff out small scratches left by the sandpaper. Put some pressure on the pen. That will heat the wax. Fill in all the small scratches and give your wood a great shine.
- Assemble your pen using the materials found in the kit.
Advanced pen turning techniques
- Cherry, dogwood, apple, and pear are the best materials for pen turning.
- Pens are turned from 3/4 x 3/4 x 6inch planks of wood.
- Keep your tools sharp.
- Several layers of CA glue give quality products.
DIY pen mandrel
- Gather rods.
- Mark it and cut it through with a hacksaw while spinning it in the lathe.
- Drill the nut through with a 5mm drill bit, then tap a 6mm thread through it.
- Make a die-cutting holder.
- Centre drills the end so it can seat on the tailstock centre.
- Cut the head off and centred it in the 4-jaw chuck using a dial gauge to get it accurate. The 4-jaw chuck can be adjusted for high centre accuracy, while the 3-jaw self-centering chucks have a small run out.
- Mark the first section halfway (10mm and 10mm), and the second section at 10mm. Cut off the bushings starting with the outside first.
- Mark the first section halfway (10mm and 10mm), and the second section also at 10mm (closest to the chuck)
- Cut off the bushings starting with the outside first.
- Finish with fine sanding.
In conclusion, the woodturning process is fascinating, and the results make for a beautiful pen. So whether you’re new to turning pens or have been doing it for years, “How to wood turn pens” offers information, tips, and techniques that will help you master the art of turning pens of your own.

- Grain and Sheen: Teak Oil versus Danish Oil Uncovered - January 10, 2024
- The Cherry on Top: Crafting the Perfect Cutting Board - January 9, 2024
- Polyurethane Water-Based vs Oil-Based: Choosing the Right Finish - January 8, 2024