Wood stairs are a great way to give your home a classic, timeless look, but they may need a small touch-up after years of use. Older wood stairs often become scuffed and scratched, and though you may want to put off cleaning them, they’re easier to clean and brighten than they look. Here’s how to varnish wood stairs.
Sand the stairs before varnishing
- The first stage is to eliminate any uneven surfaces that have formed over the years. Issues such as nicks, dents, and any remaining finishes will need to be removed. This removal can be done by using medium-grit sandpaper. Medium grit sandpaper is often within the 60-100 grit range.
- If you have one available, your fastest option would be to use this in conjunction with an electric random orbital sander. This machine will help you get through the more extensive and easily-accessible surfaces much faster.
- For the most difficult to access areas like corners, you may need to use a finishing sander.
- A small wood chisel is a valuable standard tool for the impossible to reach areas. Use this tool for any bits of finish that cant be removed.
- If the stairs have a history of being stained, you will likely not have to strip them down entirely in this fashion.
- Ensure that while you work, you wear the appropriate protective gear. This should include thick gloves and eye protection, at the very least.
- You keep the sander in constant motion while working using even back-and-forth strokes.
Prep the stairs
- You will need to prepare both the area and the stairs before you begin working. Ensure that there is nothing close to the stairs by moving anything near the stairs away.
- There will likely be lots of dust from the sanding; therefore, it is best to open many doors and windows in the room to provide extra ventilation.
- To prevent chemicals from going on the walls, add tape to them.
- Hammer in any loose nails that are protruding out of the staircase.
- When preparing the stairs, you should determine if you need to use a chemical stripper. Chemical strippers are used for removing the old stains from the stairs. You should only use this if you feel the old paint is too thick/heavy.
- The last stage of preparation, as discussed above, is to sand the surface of the wood. This procedure will help to get rid of the previous finish entirely.
- Once complete, you can use a vacuum to remove any lingering dust.
Use a good quality varnish.
Choosing the best stain and varnish for your stairs is an important decision. You will also need a wood conditioner to treat the wood in most cases.
If you choose an oil-based stain, you must purchase an oil-based varnish and conditioner. If you decide to go with a water-based stain, you will also need to buy a water-based varnish and conditioner. These products work hand in hand and are compatible. Choosing a mis-matched varnish and conditioner for the stairs will lead to a rough and non-lasting finish.
Generally, Oil-based products are the preferred choice because they offer a durable deep, and rich finish. Consumers sometimes choose water-based products because of their easy maintenance. These options are growing in popularity because they are considered more eco-friendly.
If your budget is stretched, you can consider leaving out the wood conditioner because it isn’t essential. If you can, however, afford it, the product is highly recommended for improving the lifespan of the wood.
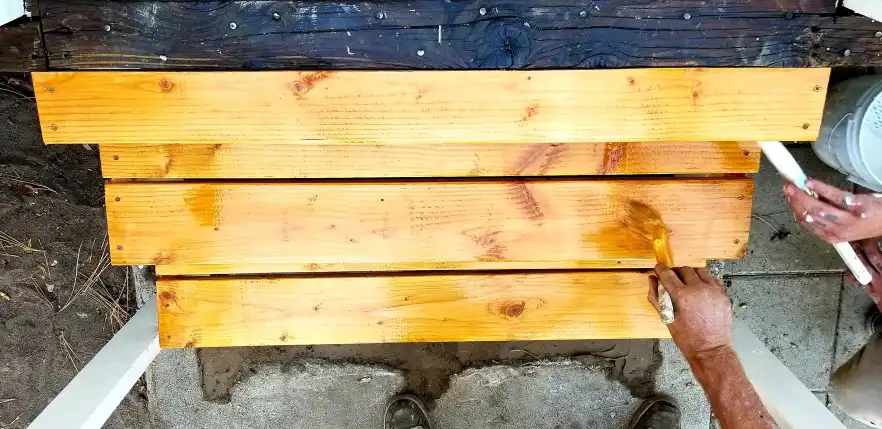
Apply a base coat
Applying the base coat of varnish can be done with a paintbrush or rag. Ensure that the brush always remains wet while working. Make sure to follow the instructions written on the packaging to find the optimal mix. Make sure when working you apply even layers with a brush or rag. Use long and broad strokes to move quickly through each step. The best direction to follow is with the grain of the wood. Give each stair 6 hours to dry. This period should allow the varnish to dry and penetrate the wood.
Make sure the wood is dry.
You will need to apply several coats of varnish to complete this project. Ensuring the wood is dry before applying the next coat is vital. If the wood has not sufficiently dried, there is a chance that the varnish will become very thick and form uneven layers.
Apply the finished coat
Before you apply the final coat, check that the varnish coats already applied are fully dry. This result will mean the surface doesn’t feel sticky when you touch it. You can try to sand the surface a little to check, and if your sandpaper becomes clogged with residue, you need to wait a few more hours. Stairs that are used often will need heavy-duty coating. Five coats should be sufficient. When applying the final coat, you need to let it cure for several weeks before using the stairs.
Use a lint-free cloth.
Microfiber cloths are trendy lint-free cloths that you can use to varnish stairs. These cloths work well because they are highly absorbent toward stains on wooden surfaces. They are ideal for wiping off the excess varnish.
How to sand and stain stairs
- You will need to power and hand sand using at least an 80-grit medium sandpaper. If available, it’s best to use a random orbital sander for large surface areas and then hand sand the more challenging to reach places. Always sand with the grain as you work.
- Be generous in your application of stains. Perform this task using a brush or lint-free cloth. Once complete, you can wipe off any excess stain.
- Give the product 12 hours to dry at least. It is best to perform these tasks at night to use the stairs throughout the finishing process.
Refinish wood stairs without sanding
It is not advisable to refinish wood stairs without sanding. Doing this can lead to uneven surfaces being formed as a result.
Anti-slip varnish for stairs
Bona Traffic HD Anti Slip Varnish is one of the top options available to use on stairs.
- 6 Tips To Craft The Perfect DIY Woodworking Project - August 1, 2022
- Six Reasons You Need an Air Filter In Your Wood Workshop - August 1, 2022
- American made wood lathes - May 26, 2022